Have you ever wondered how something as simple as apple scraps can transform into a powerhouse ingredient bursting with flavor and health benefits?Making your own apple cider vinegar at home is not only simple but also a fulfilling way to reduce waste and embrace natural, sustainable living.Furthermore, it adds a unique and personal touch to your pantry staples. Whether you’re crafting tangy vinaigrettes, mixing detox drinks, or exploring eco-friendly household uses, this DIY project offers both versatility and satisfaction.
Table of Contents
ToggleIn this guide, we’ll take you step by step through the process—starting with selecting fresh apples and continuing to perfect the fermentation. Ultimately, we’ll show you how to turn those humble leftovers into a jar of golden magic you’ll adore!
Why You’ll Enjoy Making Your Own Apple Cider Vinegar
Before we jump into the recipe, let’s take a look at a few great reasons to craft your own apple cider vinegar at home:
- Control Over Quality: Making it yourself lets you select organic apples and steer clear of the additives and preservatives often found in store-bought options.
- Budget-Friendly: Repurpose apple scraps and leftovers to create a flavorful vinegar while keeping costs down.
- Health Perks: Packed with probiotics and beneficial acids, apple cider vinegar may support digestion, assist with weight management, and help regulate blood sugar levels.
- Flavor Customization: You can adjust the sweetness, acidity, and flavor profile according to your taste preferences, making it truly your own.
- Sustainability: Turning apple scraps into vinegar is a smart, eco-friendly way to cut down on food waste and get the most out of your groceries.
Key Benefits of Apple Cider Vinegar
Why should you make your own apple cider vinegar? Beyond the satisfaction of creating something from scratch, homemade apple cider vinegar offers a wealth of benefits:
- Rich in Probiotics: The fermentation process produces beneficial bacteria that support gut health and improve digestion.
- Natural Remedy: Known for its immune-boosting properties, apple cider vinegar can be used as a natural remedy for soothing sore throats or balancing blood sugar levels.
- Cost-Effective and Eco-Friendly: Making it at home helps reduce food waste by repurposing apple scraps while saving money on store-bought alternatives.
- Versatility in Use: From zesty salad dressings to invigorating detox drinks, apple cider vinegar is a must-have for any home cook.
- Pure and Additive-Free: When you make it yourself, you control the ingredients, ensuring it’s free from preservatives and unnecessary additives.
Homemade apple cider vinegar goes beyond health benefits—it’s a sustainable, hands-on practice that deepens your connection to your ingredients and enhances your culinary journey.Ready to get started? Let’s dive into the ingredients!
Nutrition Information (per 1 tablespoon)
- Calories: 2
- Fat: 0g
- Protein: 0g
- Carbs: 0.5g
- Fiber: 0g
- Sugar: 0.5g
- Sodium: 0mg
Note: Nutritional values can vary slightly depending on sugar used and fermentation time.
Ingredients You’ll Need
Ingredients Needed
Gathering the right ingredients is the first step to making apple cider vinegar that’s bursting with flavor and natural goodness. Here’s what you’ll need:
- Fresh Apples or Apple Scraps: Choose organic apples if possible. You can use either whole apples or the peels and cores left over from other recipes.
- Sugar: A small amount of sugar kickstarts the fermentation process. Cane sugar works best, but you can also use honey as a natural alternative.
- Water: Filtered or distilled water ensures no chlorine or impurities interfere with fermentation.
- Fermentation Jar: A large glass jar is ideal for holding the mixture and allowing it to ferment properly.
- Cheesecloth or Clean Cloth: This will cover your jar, keeping out debris while allowing airflow.
- Rubber Band: To secure the cloth over the jar and maintain a clean fermentation environment.
Pro Tip:
When choosing apples, aim for a mix of sweet and tart varieties to achieve a well-rounded flavor profile. Additionally, if you’re using scraps, ensure they are free of mold or bruises to avoid spoilage.
With these simple ingredients in hand, you’re ready to embark on your apple cider vinegar journey. Now, let’s dive into the step-by-step process to transform these humble components into liquid gold!
How to Make Apple Cider Vinegar
Crafting your own apple cider vinegar is easy, rewarding, and a step toward a more mindful, waste-free lifestyle. Follow these steps to ensure success:
Prep Your Apples
- Begin by thoroughly washing your apples to eliminate any dirt or residue.
- Cut whole apples into small pieces, or gather fresh apple scraps like peels and cores. Ensure there’s no mold or discoloration.
Combine Ingredients
- Fill a large glass jar about three-quarters full with your apple pieces or scraps.
- Dissolve 1–2 tablespoons of sugar in enough filtered water to fully cover the apples. Pour the sweetened water into the jar, making sure the apples are completely submerged.
Cover and Secure
- Place a clean cloth or cheesecloth over the mouth of the jar to allow airflow while keeping out dust and insects. Secure it with a rubber band.
Begin Fermentation
- Store the jar in a dark, room-temperature spot (around 70°F/21°C). Stir the mixture daily to prevent mold and encourage even fermentation. Within a few days, you’ll notice bubbling as fermentation begins.
Strain the Liquid
- After 1–2 weeks, strain out the apple solids and return the liquid to the jar. Cover it again with the cloth and allow it to ferment for another 3–4 weeks. Stir occasionally to help the process along.
Test and Bottle
- Taste the vinegar periodically to monitor its tanginess. Once it reaches the desired acidity, transfer it to a sterilized glass bottle with a tight-fitting lid. Store in a cool, dark place.
Pro Tip:
The fermentation process thrives on patience. If the flavor isn’t strong enough, let it ferment longer, tasting weekly until it’s just right.
Congratulations! You’ve made your very own apple cider vinegar, ready to enhance your recipes and daily routine. Now, let’s dive into tips for personalizing your creation.
Pro Tips and Variations
Making apple cider vinegar is a creative process, and a few expert tips can elevate your homemade batch to the next level. Here’s how to customize and troubleshoot like a pro:
Pro Tips for Perfect Vinegar
- Use High-Quality Ingredients: Organic apples and filtered water yield the best results. Avoid tap water, as chlorine can inhibit fermentation.
- Keep it Submerged: Apples exposed to air may develop mold. Use a weight, like a small glass jar or a clean stone, to keep the pieces fully submerged.
- Stir Daily: During the initial fermentation, stir the mixture daily to prevent mold and ensure even fermentation.
- Monitor the Temperature: Keep the jar in a spot with consistent room temperature (65–75°F). Too cold, and the process slows; too hot, and it may spoil.
Flavor Variations to Try
- Cinnamon Apple Vinegar: Add a cinnamon stick during fermentation for a warm, spiced twist.
- Honey-Infused Vinegar: Use honey instead of sugar for a milder, naturally sweet flavor.
- Citrus Notes: Toss in orange or lemon peels for a refreshing citrusy aroma.
- Herbal Infusions: Add fresh rosemary, thyme, or mint to enhance the aroma and flavor profile.
Troubleshooting Common Issues
- Cloudy Liquid: This is normal and part of the fermentation process. The “mother” bacteria create this cloudiness and are a sign of healthy vinegar.
- White Film on Top: A harmless layer of yeast (called kahm yeast) may form. Simply skim it off and continue.
- Strong or Weak Flavor: Adjust the fermentation time. Longer fermentation develops a more robust flavor, while a shorter time results in milder vinegar.
Final Tip:
To keep track of the fermentation timeline, label your jar with the start date. This way, you’ll know exactly when to test and bottle your vinegar.
By experimenting with these tips and variations, you can create a vinegar that’s uniquely your own. From here, let’s delve into the many ways you can use and enjoy your homemade apple cider vinegar!
If you loved this recipe, please consider giving it astar rating and sharing
your experience in thecomments below!
Serving Suggestions
Now that your homemade apple cider vinegar is ready, it’s time to explore all the amazing ways to use it! This versatile ingredient can add flavor, health benefits, and a touch of creativity to your everyday recipes and routines. Here are some ways to enjoy it:
In the Kitchen
- Salad Dressings: Whisk together apple cider vinegar, olive oil, Dijon mustard, and honey for a tangy vinaigrette.
- Marinades: Use it to tenderize meats or add a zesty kick to chicken, pork, or tofu marinades.
- Baking: A splash of apple cider vinegar can activate baking soda for fluffier cakes and muffins.
- Soups and Stews: Add a tablespoon at the end of cooking to brighten up flavors and balance richness.
As a Health Tonic
- Morning Detox Drink: Mix 1–2 teaspoons of apple cider vinegar with warm water, a squeeze of lemon, and a drizzle of honey for a refreshing start to your day.
- Refreshing Beverages: Create a sparkling vinegar soda by adding a splash of apple cider vinegar to sparkling water and a dash of fruit juice.
Around the Home
- Natural Cleaner: Dilute with water and use it to clean kitchen counters, glass, and more. Its antibacterial properties make it a great eco-friendly alternative to chemical cleaners.
- Fruit and Veggie Wash: Mix with water to clean produce and remove any lingering wax or dirt.
Pro Tip:
As apple cider vinegar’s flavor deepens over time, be sure to taste-test it before incorporating it into recipes. Additionally, for milder applications, you can dilute it with water to soften its sharpness.
Given its versatility, you’ll soon find yourself reaching for your homemade jar time and time again. Indeed, it’s a kitchen essential that enhances flavor and brings a boost of health to every dish it complements!
Safety Considerations
While making apple cider vinegar is generally safe, here are some precautions to keep in mind:
- Always ensure your utensils and jars are clean to avoid contamination.
- Keep an eye out for mold: If any appears on the surface, discard the batch, as it may be unsafe to consume.
- Store in a cool, dark place: This helps maintain its flavor and quality.

How To Make Apple Cider Vinegar That You’ll Love
Ingredients
- Use fresh apples or apple scraps (peels and cores). Opt for organic apples if possible.
- Sugar (cane sugar works best) kickstarts fermentation. but you can also use honey as a natural alternative.
- Use filtered or distilled water to avoid chlorine or impurities.
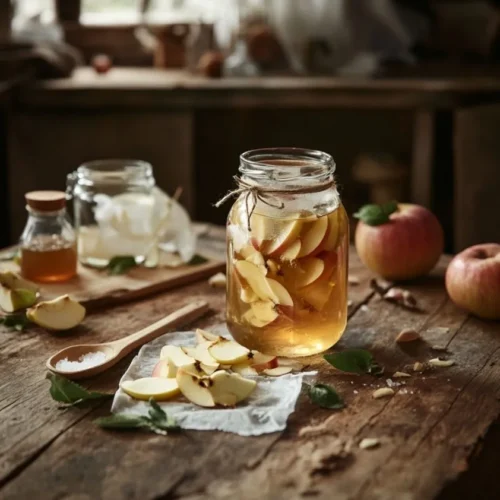
- Use a large glass jar for proper fermentation.
- Cheesecloth or Clean Cloth: This will cover your jar keeping out debris while allowing airflow.
- Use a rubber band to secure the cloth for a clean fermentation.
Instructions
- Transforming simple ingredients into homemade apple cider vinegar is easier than you think. Follow these step-by-step instructions to get it just right:
Prepare the Apples
- Wash your apples thoroughly to remove any dirt or pesticides.
- If using whole apples, chop them into small pieces. If using scraps, ensure they’re fresh and free of mold or bruising.
Mix the Ingredients
- Place the apple pieces or scraps in a large glass jar, filling it about three-quarters full.
- Dissolve 1–2 tablespoons of sugar in filtered water (enough to cover the apples) and pour it over the fruit. Ensure the apples are fully submerged.
Secure and Cover
- Cover the jar with a clean cheesecloth or cloth to allow airflow while keeping dust and insects out. Secure it with a rubber band.
Primary Fermentation
- Store the jar in a dark, room-temperature location (about 70°F/21°C) for 1–2 weeks. Stir the mixture daily to prevent mold and encourage fermentation. You’ll notice bubbling as the natural fermentation process begins.
- Strain and Continue Fermentation
- After 1–2 weeks, strain the liquid to remove the apple solids. Transfer the liquid back into the jar and cover it again with the cloth.
- Let it ferment for another 3–4 weeks, stirring occasionally. During this time, the vinegar will develop its tangy flavor and signature aroma.
- Test and Store
- Taste the vinegar to check its acidity. Once it reaches your desired tanginess, transfer it to a sterilized bottle with a tight lid. Store in a cool, dark place.
Pro Tip:
- Patience is key! Fermentation times may vary depending on the temperature and the sweetness of your apples, so don’t rush the process.
- You’ve just made your own apple cider vinegar! Now, let’s explore some tips to customize and enhance your creation.
Video
Notes
- Apples Selection: Use fresh, organic apples. Sweet varieties result in milder vinegar, while tart apples create a sharper taste. Cores and peels can be included to reduce waste.
- Fermentation Starter: Adding raw, unpasteurized apple cider vinegar with the “mother” can speed up fermentation, but it’s optional.
- Sweeteners: Adding sugar or honey is optional but can enhance the fermentation process by feeding the natural bacteria.
- Equipment Care: Use sterilized glass jars or crocks. Avoid metal containers, as vinegar’s acidity can react with metal.
- Environment: Maintain a temperature between 60–80°F (15–27°C). Warmer temperatures accelerate fermentation, but excessive heat may kill beneficial bacteria.
- Monitoring: Stir daily during the initial fermentation phase to prevent mold growth and ensure even fermentation.
- Signs of Progress: Expect a cider-like aroma after 1–2 weeks, bubbling during fermentation, and eventual development of a “mother.”
- Straining: Remove apple solids after 1–2 weeks for clearer vinegar and continue fermenting the liquid.
- Timeframe: Total fermentation time is typically 4–6 weeks, depending on desired acidity.
- Storage: Transfer to sterilized bottles and store in a cool, dark place. Homemade ACV can last for years if properly sealed.
- Uses: Excellent for cooking, cleaning, or as a health tonic when diluted.
Conclusion
Crafting apple cider vinegar at home isn’t just about following a recipe—it’s a fulfilling experience that brings you closer to your ingredients and supports a sustainable, eco-friendly lifestyle.With just a few simple steps, you’ve turned humble apple scraps into a versatile and healthful kitchen staple.
From crafting flavorful salad dressings to enhancing your wellness routine, the possibilities with apple cider vinegar are endless. Plus, you get the added benefit of knowing exactly what’s in your jar—pure, natural, and free from unnecessary additives.
So why not give it a try? Experiment with flavors, find new ways to use it, and share your homemade vinegar with family and friends. Once you’ve experienced the satisfaction of creating your own, you’ll never look at apple scraps the same way again.
Ready to take the next step? Let’s tackle some frequently asked questions to ensure your vinegar-making experience is smooth and successful!
FAQS
How do you know when homemade apple cider vinegar is ready?
Taste it! It’s ready when it has a tangy, acidic flavor and a pleasant vinegar aroma.How long does apple cider vinegar need to ferment?
Typically, 4–6 weeks: 1–2 weeks for primary fermentation and 3–4 weeks for secondary.How do you store homemade apple cider vinegar?
Store it in a sterilized glass bottle with a tight lid in a cool, dark place.Is homemade vinegar safe?
Yes, as long as you use clean equipment and follow proper fermentation practices.How long is homemade apple cider vinegar good for?
It can last indefinitely when stored properly, though the flavor may evolve over time.How long does homemade cider last?
Fermenting cider can last up to several weeks, depending on the process and desired flavor.How long can you use apple cider vinegar after opening?
Indefinitely! It’s self-preserving due to its high acidity.How long can I leave cider fermentation?
Up to 6 weeks or more, depending on temperature and taste preferences.